FREE Worldwide Shipping! | +1 365 654 6605

0

Your Cart is Empty

DIY Kitchen Appliance Stand: A Stylish and Organized Solution for Your Countertop Clutter

January 03, 2024 6 min read

DIY Kitchen Appliance Stand: A Stylish and Organized Solution for Your Countertop Clutter - Maria's Condo

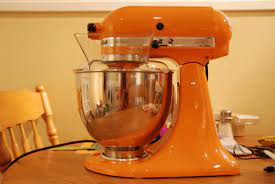
Are you tired of your kitchen countertops being cluttered with various small appliances? Do you dream of having a neat and organized space where you can easily access your kitchen gadgets without sacrificing valuable counter space? Look no further than a DIY Kitchen Appliance Stand! In this comprehensive guide, we will explore different ideas and techniques to help you create a stylish and functional appliance stand that will revolutionize the way you use your kitchen.

Section 1: Introduction

1.1 Introducing the DIY Kitchen Appliance Stand

In today's modern kitchens, small appliances have become a necessity for efficient cooking and food preparation. However, storing these appliances can be a challenge, especially if you have limited counter space. A DIY Kitchen Appliance Stand is the perfect solution to keep your countertop clutter-free while still having easy access to your favorite gadgets.

1.2 Benefits of a Kitchen Appliance Stand

The benefits of a DIY Kitchen Appliance Stand go beyond just decluttering your countertops. Here are some key advantages:

  • Maximizes counter space: By storing your appliances vertically, you can free up valuable counter space for meal preparation and other tasks.
  • Easy access: With a dedicated stand, your appliances are within reach, making it convenient to grab and use them whenever needed.
  • Organized storage: A well-designed appliance stand allows you to neatly arrange your appliances, reducing the risk of damage and making it easier to find what you need.
  • Stylish and customizable: You can personalize your appliance stand to match your kitchen decor and add a touch of style to your space.

Section 2: Choosing the Right Design

2.1 Understanding Different Appliance Stand Designs

There are various designs and styles to choose from when it comes to DIY Kitchen Appliance Stands. Let's explore some popular options:

  • Cabinet-style stand: This design involves repurposing a cabinet or building a custom cabinet with shelves and doors to hide your appliances when not in use.
  • Open shelving stand: If you prefer a more open and accessible storage solution, open shelving stands provide easy visibility and quick access to your appliances.
  • Retractable stand: For a sleek and space-saving option, consider a retractable stand that allows you to hide your appliances within a cabinet or wall unit and slide them out when needed.

2.2 Assessing Your Kitchen Layout and Space

Before diving into your DIY project, take a moment to assess your kitchen layout and available space. Consider the following factors:

  • Size and number of appliances: Take an inventory of the appliances you plan to store and their dimensions. This will help you determine the size and capacity of your appliance stand.
  • Counter space: Measure your countertops to ensure your appliance stand will fit comfortably without obstructing other areas.
  • Accessibility: Determine the most convenient location for your appliance stand, considering factors such as proximity to power outlets and ease of use.

Section 3: Materials and Tools

3.1 Essential Materials for Your DIY Appliance Stand

To build your own kitchen appliance stand, you will need the following materials:

  • Wood or plywood: Choose a sturdy and durable material that matches your desired aesthetic.
  • Screws and nails: Select appropriate sizes for securing the components of your stand.
  • Hinges and hardware: Depending on your chosen design, you may need hinges, drawer pulls, and other hardware for functionality and style.
  • Paint or stain: Add a finishing touch to your stand with a coat of paint or stain that complements your kitchen decor.

3.2 Tools Required for the Project

Gather the following tools to ensure a smooth DIY experience:

  • Measuring tape: Accurate measurements are crucial for a well-fitted appliance stand.
  • Saw: Depending on your selected design, you may need a circular saw, jigsaw, or miter saw to cut the wood to the desired dimensions.
  • Drill: A power drill will be essential for creating holes and securing screws.
  • Screwdriver: Choose a screwdriver that matches the type of screws you will be using.
  • Sandpaper: Smooth out rough edges and create a polished finish with sandpaper.
  • Paintbrushes: Use brushes of various sizes for applying paint or stain.

Section 4: Step-by-Step Guide to Building Your Appliance Stand

4.1 Step 1: Design and Planning

Begin by finalizing your design and creating a detailed plan. Consider the dimensions, layout, and specific features you want to incorporate. This will serve as your blueprint throughout the project.

4.2 Step 2: Gather Materials and Tools

Refer to the materials and tools lists in Section 3 and gather everything you need for the project. Ensure you have all the necessary items before proceeding.

4.3 Step 3: Measure and Cut the Wood

Measure and mark the dimensions for each component of your appliance stand on the wood or plywood. Use a saw to cut the pieces according to your measurements. Take your time to ensure clean and accurate cuts.

4.4 Step 4: Assemble the Stand

Begin assembling your appliance stand by following your design plan. Use screws and nails to secure the pieces together, ensuring a sturdy and stable structure. Check for alignment and make any necessary adjustments as you go.

4.5 Step 5: Finishing Touches

Once the stand is fully assembled, sand any rough edges or surfaces. Apply paint or stain to enhance the appearance and protect the wood. Allow ample drying time before moving on to the next step.

4.6 Step 6: Mounting and Installation

Determine the best location for your appliance stand and mark the positions for mounting. Use appropriate hardware to secure the stand to the wall or countertop, ensuring it is level and secure.

Section 5: Organizing Your Appliances

5.1 Arranging Your Appliances

With your DIY Kitchen Appliance Stand complete, it's time to organize your appliances. Consider the following tips for efficient and practical arrangement:

  • Group similar appliances together: Place appliances used for similar purposes, such as baking or blending, in the same section of your stand.
  • Prioritize frequently used appliances: Keep the appliances you use most often towards the front or at eye level for easy access.
  • Utilize adjustable shelving: If your stand has adjustable shelves, take advantage of this feature to accommodate appliances of different heights.

Section 6: Maintenance and Safety Tips

6.1 Cleaning and Maintenance

To keep your appliance stand looking its best and functioning properly, follow these maintenance tips:

  • Regularly wipe down the stand with a damp cloth to remove dust and spills.
  • Check for any loose screws or hinges and tighten them as needed.
  • Follow manufacturer's guidelines for cleaning and maintaining your specific appliances.

6.2 Safety Considerations

When using and storing your appliances, keep the following safety tips in mind:

  • Ensure proper ventilation and airflow to prevent overheating.
  • Unplug appliances when not in use to conserve energy and reduce the risk of electrical hazards.
  • Follow all safety instructions provided by the appliance manufacturer.

Section 7: Inspiration and Design Ideas

7.1 Appliance Stand Styles and Themes

Get inspired by different appliance stand styles and themes to find the perfect design for your kitchen:

  • Modern and minimalist: Opt for sleek lines, neutral colors, and minimalist hardware for a contemporary look.
  • Vintage and rustic: Embrace natural wood finishes, distressed details, and vintage-inspired hardware for a charming farmhouse feel.
  • Industrial and urban: Incorporate metal accents, exposed hardware, and bold colors for an edgy and urban vibe.

7.2 Creative Uses for Appliance Stands

Think outside the box and explore alternative uses for your appliance stand:

  • Bookshelf or display stand: Arrange cookbooks or decorative items on the shelves of your stand for a functional and stylish display.
  • Spice rack or pantry organizer: Use your appliance stand to store spices, condiments, or pantry staples for easy access during meal preparation.

Section 8: Conclusion

8.1 Embrace the Beauty of a Clutter-Free Kitchen

By building your own DIY Kitchen Appliance Stand, you can create a clutter-free and organized kitchen environment. Say goodbye to countertop chaos and hello to a stylish and functional space that inspires your culinary adventures. Follow the steps and tips provided in this guide to embark on your DIY journey and transform your kitchen into a haven of efficiency and elegance.

Remember to always prioritize safety, measure carefully, and take your time throughout the process. With a little creativity and craftsmanship, you can create a kitchen appliance stand that reflects your personal style and enhances the functionality of your space.

References

Marias Condo
Marias Condo


Also in Kitchen

Why Do Kitchen Scissors Have a Hook? Unveiling the Secret! - Maria's Condo
Why Do Kitchen Scissors Have a Hook? Unveiling the Secret!

April 16, 2024 7 min read

The Best Kitchen Shears for Prepping Anything - Maria's Condo
The Best Kitchen Shears for Prepping Anything

April 16, 2024 6 min read

Kitchen Scissors: The Versatile and Essential Tool for Every Chef - Maria's Condo
Kitchen Scissors: The Versatile and Essential Tool for Every Chef

April 16, 2024 6 min read